
If you’ve ever admired the beautiful flowers of African violets and wanted to grow more, you’re in luck! Propagating these plants in water is both easy and enjoyable, giving you the chance to watch new growth unfold. Just take a healthy leaf from your favorite violet, and with a little patience, it can become an entirely new plant. It feels like magic, only much simpler!
This method requires just a few basic supplies: a healthy leaf, a clear container, and some water. No fancy tools or gardening degrees are needed! So, whether you’re a seasoned plant parent or just starting, let’s dive into the delightful world of water propagation and get those new African violets growing!
Propagating African Violets in Water Common Mistakes and How to Avoid Them
The Importance of Clean Water
Let’s dive right into one of the most crucial aspects of propagating African violets in water: the water itself. You might think, “Water is water, right?” But hold your horses! Using dirty or contaminated water can lead to all sorts of problems, including rot and disease. So, always start with clean, fresh water. Tap water is usually fine, but if you have filtered or distilled water, that’s even better.
Choosing the Right Container
Next up, let’s talk about containers. Not just any old cup will do! You want something that’s not only clean but also clear. A glass jar or a clear plastic cup works wonders because it allows you to see the root development as it happens. Imagine trying to watch a movie with the curtains drawn, no fun, right? If you use an opaque container, you might miss those exciting root-growing moments. Plus, a clear container helps you keep an eye on the water level and any potential algae growth.
Avoiding Overcrowding – Propagating African Violets in Water
Now, here’s a common pitfall: overcrowding your propagation station. It’s tempting to pop several leaf cuttings into one container, but resist that urge! Each leaf cutting needs its own space to grow roots without competing for resources. So, give each cutting its own cosy little home in separate containers.
Preventing Leaf Rot
Leaf rot is the nemesis of any propagation enthusiast. It often sneaks in when you least expect it, so let’s talk about how to keep it at bay. First, ensure that the cut end of the leaf is submerged in water but that the leaf itself remains above the surface. If the leaf sits in water, it’s a recipe for disaster. Also, regularly change the water, at least once a week, to keep it fresh and oxygenated. Stale water is a breeding ground for bacteria, and no one wants that!
Monitoring Light Conditions – Propagating African Violets in Water
Light is another crucial factor in your propagation success story. African violets thrive in bright, indirect light, but too much direct sunlight can be a disaster. Place your container in a spot that gets plenty of light but isn’t too hot. A windowsill with filtered sunlight is usually perfect.
Patience is Key
Finally, let’s talk about patience. Propagation is not a race; it’s more like a stroll through a beautiful garden. Many new gardeners get anxious if they don’t see roots sprouting immediately. Remember, good things take time! Typically, you’ll start seeing roots in about 2 to 4 weeks. So, resist the urge to constantly check on your cuttings every hour, give them some space to work their magic.
Step-by-Step Instructions: Propagating African Violets in Water
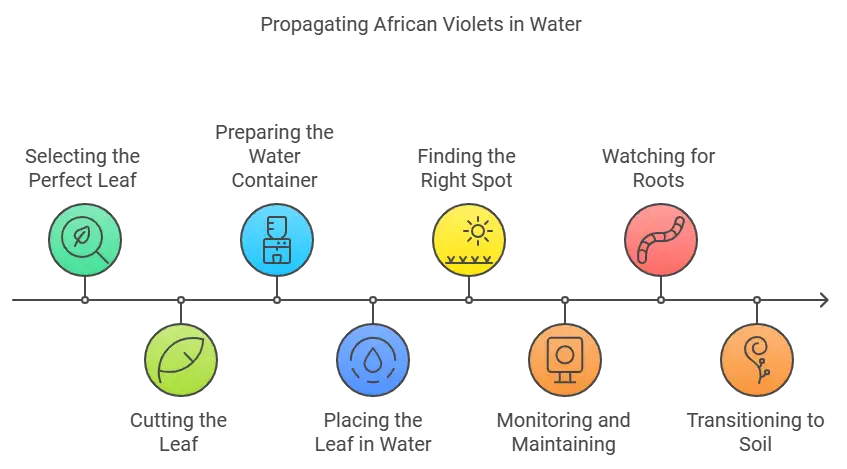
Selecting the Perfect Leaf – Propagating African Violets in Water
Let’s start with the first step: choosing the right leaf. Think of this as picking the star performer for your gardening show. You want a leaf that’s healthy, vibrant, and ready to shine! Look for a mature leaf that’s not too old. Something in the prime of its life, if you will. It should be a rich green color, free of any spots or blemishes. A leaf that’s about 4 to 6 inches long is ideal. Once you’ve found your leaf superstar, it’s time to move on to the cutting process.
Cutting the Leaf
Now, grab a clean, sharp knife or scissors. Carefully cut the leaf from the parent plant, leaving about 1 to 2 inches of stem attached. Think of it like giving your leaf a stylish haircut, ensuring it has enough length to settle into its new watery home. A slight angle cut on the stem can help increase the surface area for rooting, giving your leaf a better chance to thrive.
Preparing the Water Container – Propagating African Violets in Water
Next up, let’s talk about the water container. You don’t want just any cup; you need a small jar or cup that’s clean and clear. This will be your leaf’s new abode, and you want to make sure it’s a cosy one! Fill it with fresh, room-temperature water— tap water is fine, but if you have filtered water, then that’s perfect. Remember, your leaf will be spending some quality time here, so make sure it’s a welcoming environment.
Placing the Leaf in the Water
Now comes the exciting part: placing your leaf in the water. Gently submerge the cut end of the stem into the water, ensuring that the leaf itself stays above the surface. If your leaf seems a bit wobbly, you can use a toothpick to prop it up, creating a little support system.
Finding the Right Spot – Propagating African Violets in Water
Once your leaf is comfortably settled in its water home, it’s time to find the perfect spot for it to thrive. Look for a place that gets bright, indirect light—think of it as a sunny corner that’s not too harsh. Direct sunlight can heat the water, which is a no-go for our delicate leaf friend. We want it to feel relaxed and cosy, not scorched!
Monitoring and Maintaining
Now that your leaf is in place, it’s time to play the waiting game. But don’t worry, you’re not just sitting around doing nothing! Check the water level every few days, making sure the cut end remains submerged. If it looks low, add a splash of more water. And don’t forget to change the water weekly to keep it fresh! This helps prevent any funky smells or rot from setting in.
Watching for Roots – Propagating African Violets in Water
As the days pass, keep an eye on your leaf. Will roots appear or not? In about 2 to 4 weeks, you should start to see little roots forming. Once they’re about 2 to 3 inches long, your leaf is ready for the big move to soil.
Transitioning to Soil
When the time comes to transfer your newly rooted leaf to the soil, gently remove it from the water. Prepare a small pot filled with a well-draining soil mix—think peat and perlite for the perfect blend. Plant the rooted cutting in the soil, making sure it stands upright and stable. Give it a gentle pat to settle it in, and voila! You’ve successfully propagated an African violet.
Maintenance Tips After Rooting: Nurturing Your New African Violet
The Big Move: Transitioning to Soil
Congratulations! Your African violet cutting has sprouted roots and is ready to take the next big step in its journey—moving from water to soil. It’s time for it to leave the cosy waters of home and venture out into the world of soil. But don’t worry, this transition can be smooth and stress-free with a little preparation.
First, gather your supplies. You’ll need a small pot with drainage holes—because nobody likes soggy feet, especially your new plant! A standard potting mix works well, but if you want to spoil your violet a bit, consider a blend specifically designed for African violets. These mixes are light and fluffy, providing the perfect environment for your new roots to thrive. You can get it here.
When it’s time to plant, gently remove the rooted cutting from the water. Place the cutting in the centre of the pot and fill in around the roots with soil. Give it a gentle pat to make sure it’s snug but not too tight.
Acclimating Your Plant
Now that your cutting is in its new home, it’s time for some acclimation. Place the pot in a spot with bright, indirect light—this is the sweet spot where your plant can soak up the rays without feeling overwhelmed.
For the first few weeks, keep an eye on your violet. It might droop a little as it adjusts, but don’t panic! This is normal. Just continue to water it gently, keeping the soil consistently moist but not soggy. Think of it as giving your plant a nice drink of water after a long journey.
Watering and Fertilizing – Propagating African Violets in Water
As your African violet settles into its new pot, you’ll want to establish a regular watering routine. Watering should be done when the top inch of soil feels dry to the touch. When you do water, make sure to do so thoroughly, allowing excess water to drain out of the bottom of the pot. This helps prevent root rot and ensures that your plant is getting the hydration it needs.
After a month or so, consider introducing a balanced, water-soluble fertilizer formulated for African violets. This will give your plant a nutrient boost and encourage healthy growth. Just remember, a little goes a long way! Over-fertilizing can be like over-seasoning a dish—too much can ruin the flavor.
Repotting: When and Why
Eventually, your African violet will outgrow its cosy little pot, and that’s when it’s time to think about repotting. A good rule of thumb is to repot every 1 to 2 years or whenever you notice roots growing out of the drainage holes. Your plant will appreciate the extra room to stretch its roots!
When repotting, choose a pot that’s one size larger than the current one. Gently remove the plant from its old pot, taking care not to damage the roots. Place it in the new pot with fresh soil, and give it a little water to help settle everything in.
Before You Go – Propagating African Violets in Water

With these maintenance tips, you’re well-equipped to nurture your newly propagated African violet as it grows. Remember, patience is key. So, enjoy the journey, watch your plant thrive, and take pride in the fact that you’ve successfully propagated a beautiful African violet. Don’t forget to add our home page to your favorites so you don’t miss any new articles. Now keep going for the FAQs.
References – Propagating African Violets in Water
Little Herb Encyclopedia, by Jack Ritchason; N.D., Woodland Publishing Incorporated, 1995
The Ultimate Healing System, Course Manual, Copyright 1985, Don Lepore
Planetary Herbology, Michael Tierra, C.A., N.D., Lotus Press, 1988
Handbook of Medicinal Herbs, by James A. Duke, Pub. CRP Second Edition 2007
The Complete Medicinal Herbal, by Penelope Ody, Published by Dorling Kindersley
Check the Following Articles!
Top Low Light Succulents Indoor For Your Home
Stevia vs Sucralose: Which One Is Right for Your Health?
How To Make Calendula Extract?
Brown Fruits Name: Tasty Varieties You Need to Try Now!
Frequently Asked Questions – Propagating African Violets in Water
1. Can African violets be used for medicinal purposes?
Yes, African violets (Saintpaulia) have been traditionally used in folk medicine, although their medicinal properties are not as widely recognized or researched as some other herbs. They are believed to have mild anti-inflammatory and soothing properties, which can be beneficial for certain ailments. However, it’s important to note that scientific evidence supporting these uses is limited. We created an article about it medicinal uses.
2. How long does it take for roots to develop?
Ah, the age-old question of patience! When it comes to propagating African violets in water, you can generally expect to see roots sprouting in about 2 to 4 weeks. During this time, it’s crucial to provide the right conditions: clean water, bright indirect light, and a little TLC. So, while you’re waiting, grab a cup of coffee, kick back, and enjoy the anticipation of your leafy friend’s big debut!
3. What’s the best time of year for propagation?
While African violets can be propagated year-round, spring and early summer are prime time for this gardening adventure. During these warmer months, the increased light and humidity create an ideal environment for your cuttings to thrive. However, if you find yourself with a leaf and a dream in the middle of winter, don’t fret! With the right care, your propagation can still be successful.
4. How do I care for newly propagated plants?
Caring for your newly propagated African violets is like nurturing a baby! Once your cutting has developed roots and is ready to transition to soil, place it in a bright spot with indirect light. Keep the soil consistently moist but not soggy, like a well-wrung sponge. Water your plant when the top inch of soil feels dry to the touch.
After a month or so, you can introduce a diluted, balanced fertilizer to give your plant the nutrients it needs to grow strong and healthy. Remember, this is a gradual process, so don’t rush it.
5. Can I propagate African violets from leaves that are damaged or unhealthy?
While it’s tempting to give a second chance to a leaf that’s seen better days, it’s best to avoid using damaged or unhealthy leaves for propagation. Think of it this way: if you were trying to bake a cake, would you use stale ingredients? Exactly! Sticking to healthy, vibrant leaves increases your chances of successful rooting. Look for leaves that are lush and green, free from spots or blemishes, and you’ll set yourself up for success.
6. What should I do if my cutting starts to wilt?
If your cutting starts to wilt, don’t panic! It’s usually a sign that it needs a little extra care. Check to see if the water level is low—your cutting might just be thirsty. If the water is clean and the cutting is still wilting, it could be a sign of too much direct sunlight or a draft. Move it to a shadier spot and give it some time; sometimes, all it needs is a little TLC to perk back up.
7. How do I know when it’s time to repot my African violet?
Repotting is a natural part of your African violet’s growth journey. You’ll know it’s time to repot when you see roots poking out of the drainage holes or if the plant seems to be outgrowing its pot. Generally, repotting every 1 to 2 years is a good rule of thumb to keep your plant healthy and thriving.